Using the Customer Portal
Your Customer Portal serves as the central hub for your remodeling project. Stay informed, review important details, make decisions, and communicate with our team throughout every stage of your project.
Frequently Asked Questions
Create a Password
You can usually access your JobTread portal without setting up a traditional login. Each email notification includes a secure access link that takes you directly into your project dashboard.
If you would like to use the JobTread mobile app or plan to process payments through the portal, you will need to create a password for security purposes. Steps for setting up your password are provided below.
If you are NOT logged in:
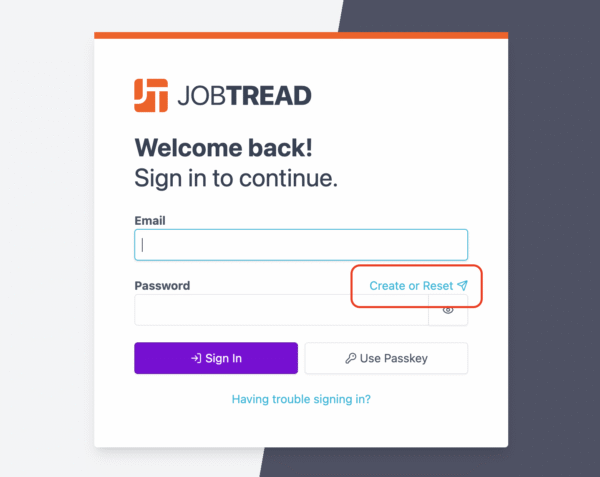
Go to app.jobtread.com.
Enter the email address we used to invite you to JobTread.
Click Create or Reset above the password field. A verification email will be sent to you with a secure link.
Open the email, follow the link, and enter your new password.
Click Set Password to complete the process.
If you are already logged in:
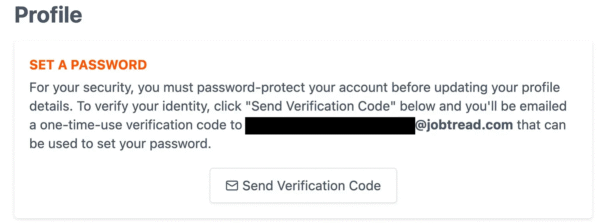
While logged into your JobTread portal, click your initials in the top right corner to open your Profile.
Click Send Verification Code to confirm your email address.
Check your inbox for the verification email and copy the code provided.
Enter the code in the Code field within your Profile.
Create a password in the Password field.
Click the purple Continue or Save Changes button at the bottom of the screen to finish.
Note: By default, your login Username is your email address.
If you do not receive the verification email, check your spam or promotions folder before reaching out to our team for assistance.
How To Install the JobTread Mobile App
Your JobTread portal is accessible from both Apple and Android phones and tablets, making it easy to stay connected wherever you are. For quicker access, we recommend adding JobTread to your home screen using the instructions below for your device.
Note: You will need to create a login password before adding the app on your mobile device.
Adding JobTread to Your Home Screen
Apple Devices (iPhone and iPad)
- Open the Safari app on your device.
- Go to app.jobtread.com.
- Tap the Share icon at the bottom of the screen.
- Scroll down and select Add to Home Screen.
- Rename the app if desired, then tap Add.
- Open the new JobTread icon from your home screen.
- Sign in to access your portal.
Android Devices
- Open the Google Chrome app on your device.
- Go to app.jobtread.com.
- Tap the More icon in the top right corner.
- Select Install App.
- Tap Add to Home Screen.
- Open the new JobTread icon from your home screen.
- Sign in to access your portal.
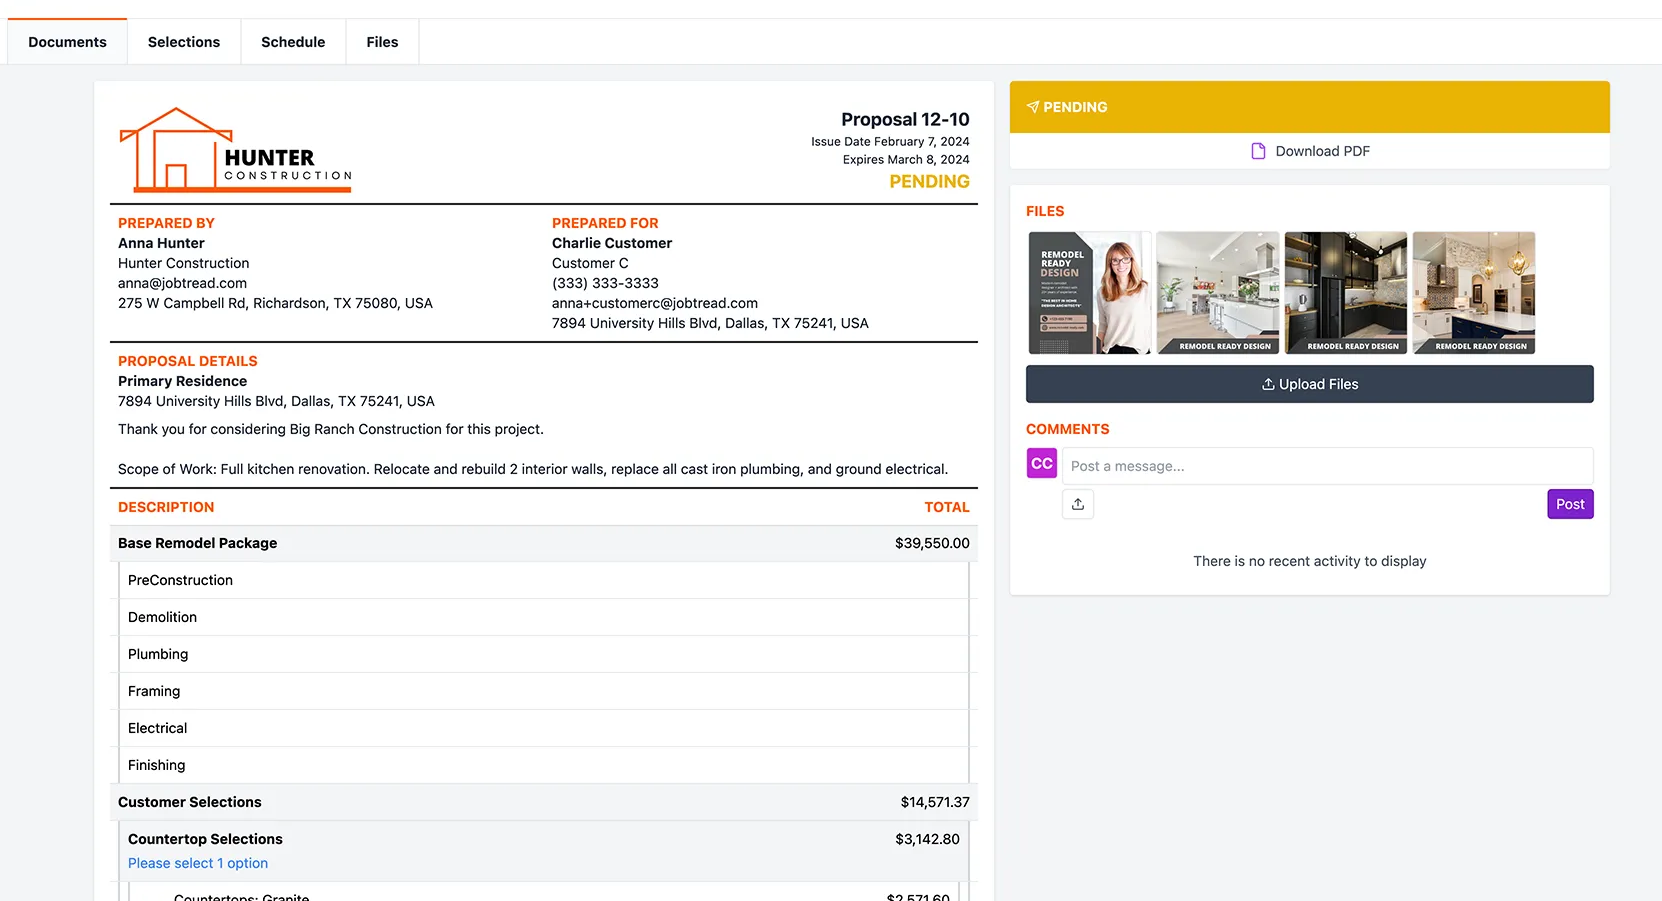
Reviewing and Approving Documents in JobTread
When a proposal, change order, or other project document is ready for your review, you will receive an email notification from JobTread. Click the button in the email and your secure link will open the document directly in your browser.
This link is unique to you, so please do not forward the email to others.
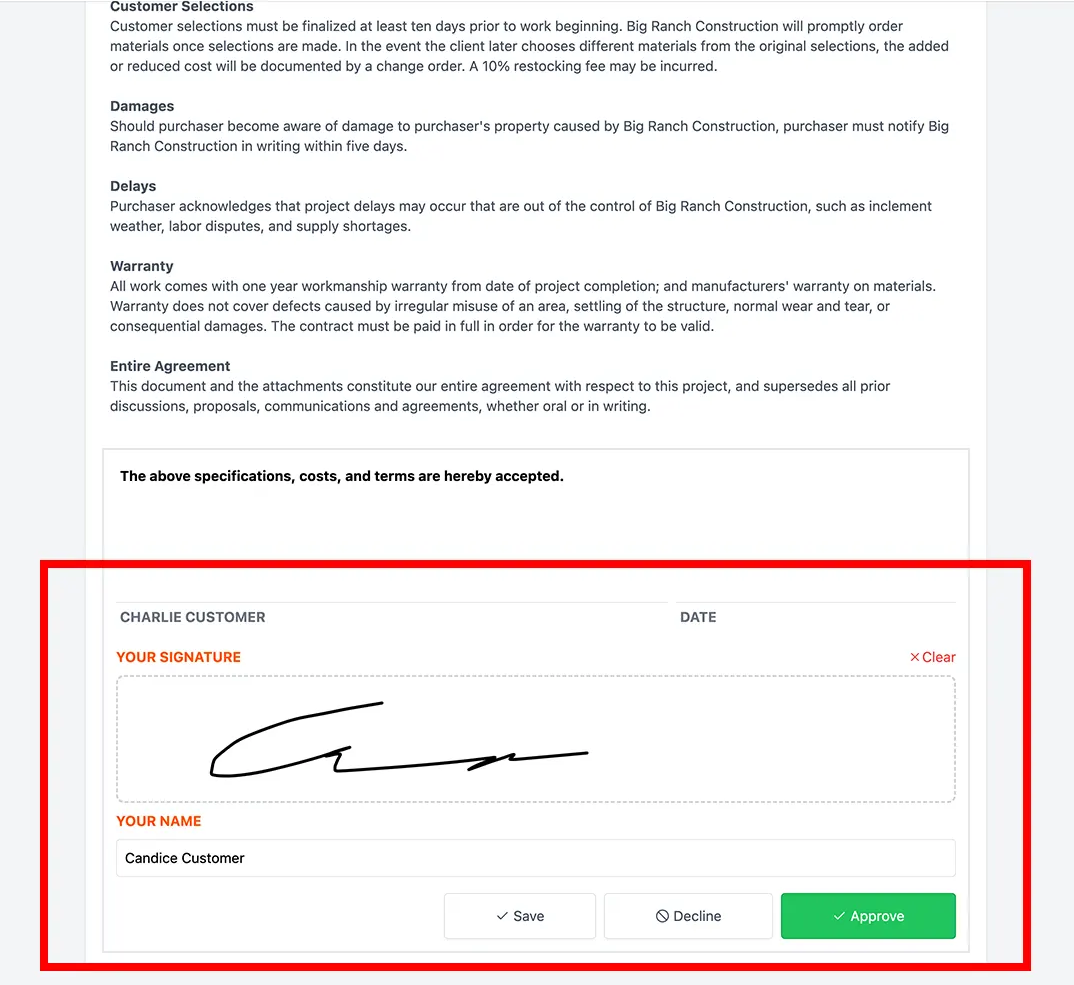
Once inside the portal:
Review the document carefully and complete any required selections.
Click to expand and view attached photos, files, or videos.
Read all terms and contract details thoroughly.
Use the Comment section to ask questions or share feedback. You can also upload supporting files, photos, or videos directly within the portal.
When ready, electronically sign at the bottom of the document and click the green Approve button to confirm.
Note: Submitting approvals promptly helps keep your project on schedule.
Reviewing and Paying Invoices in JobTread
When an invoice is ready, you will receive an email notification from JobTread prompting you to review it. Click the button in the email and your secure access link will open the invoice directly in your browser.
This link is unique to you, so please do not forward the email to others.
Review the Invoice
Carefully review the invoice details and payment terms.
Use the Comment section to ask questions or communicate with the Element team. You may also upload supporting files, photos, or documents if needed.
Payment Options
Depending on your project setup, Element may allow you to submit payment directly through JobTread.
Credit or Debit Card
- Enter your card information in the Pay Invoice section.
- Click Add Card.
- Follow the prompts to complete the transaction.
ACH Bank Transfer (US Bank Account)
For added security, you must first create a JobTread password before saving ACH banking information.
To set up your password:
Click Send Verification Code within your profile.
Check your email for the verification code.
Enter the code in the Code field.
Create a password in the Password field.
Click the purple Continue or Save Changes button.
Once your password is created:
Select the option to pay using a US Bank Account.
Search for your bank and follow the prompts to complete the transaction securely.
Note: Prompt payment helps keep your project moving forward on schedule. If you have any questions about an invoice, please reach out through the portal before submitting payment.
Sending a Message in JobTread
To communicate directly with the Element team, use the messaging tool within your JobTread dashboard. Messages posted here are tied to your specific project and notify our team right away.
To send a message:
Click the Dashboard tab while viewing your project in the portal.
At the top of the Activity Feed, locate the message field.
Type your message in the box provided.
To notify a specific team member, type the @ symbol and select their name from your project contact list.
Attach files, photos, or documents by clicking the Upload button.
Click the purple Post button to send your message.
Your message will appear in the project feed, and our team can respond directly within the same thread to keep communication organized.
Making Selections in JobTread
When it is time to choose materials or finishes for your project, Element will send your selections through JobTread. You will see a Selections tab within your portal when items are ready for review.
To complete your selections:
Click the Selections tab in your portal.
Open each selection document to review the available options.
For pre-defined choices, simply click the boxes next to the items you would like to select.
For custom or write-in selections, enter the required details in the provided fields and upload any relevant photos, files, or links. Be sure to submit write-in selections for review before signing.
Use the Comment section to ask questions or provide clarification while uploading any supporting materials.
Once everything is finalized, electronically sign and approve each selection document.
Note: Timely selections help keep your project moving forward without delays. If you have questions about any option, reach out through the portal before approving.